Pick the wrong reality capture partner. Watch your renovation budget swell over eighteen months. The right partner does the opposite. Cost forecasts tighten. Design quality holds through stakeholder review. Field crews stop tripping over surprise conditions. Facility teams inherit records they actually use after handover. This guide walks you through every expectation in plain terms.
Introduction to Scan to BIM Services
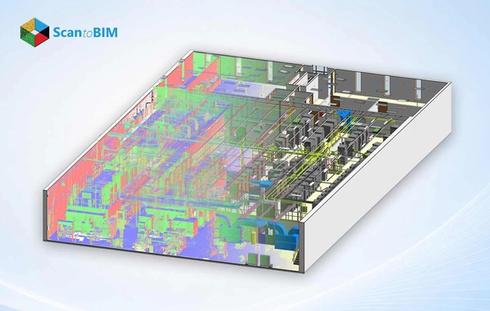
Old buildings hide surprises behind every wall. Architects meet them on site walks. Engineers meet them during clash sessions. Trades find them above stubborn ceilings. Reality capture brings those surprises into the open early. Modern laser scanners sweep a full floor plate within hours. Each scanner emits thousands of laser pulses every second. The scans feed Revit models that mirror true site conditions. Renovation teams then plan with real confidence.
Every stage of this work takes craft. Survey crews map scan stations across the site first. Technicians stitch thousands of setups into one coordinated cloud. Modelers trace what the software shows them. Quality leads check deviations against the raw data. Owners receive a tidy file package at close. The value runs well past the modeling phase too. Insurers accept the data for documentation. Property managers pull from it during system upgrades. The right partner shapes outcomes across the whole project lifecycle.
What Does a Scan to BIM Service Provider Do?
Most clients want the short answer first. A scan to BIM service provider takes raw point clouds. From there, the team shapes structured Revit content. The real work spans several clear lanes. Each lane is staffed by a different specialist. Tooling shapes the effort across every stage. Most teams run Autodesk ReCap for cloud processing. Leica Cyclone Register 360 handles raw registration. Revit dominates the modeling stage. Navisworks owns the coordination role.
- Registration cleanup: The team opens raw scans on day one. Noise filtering removes stray points fast. Stray reflections from glass disappear early. Clean data is essential for every step.
- Geometric tracing: Modelers trace walls, then columns, then slabs inside Revit. Geometry takes shape directly against the cloud. Each element snaps to measured reality. Accuracy holds across every floor.
- Family modeling: This stage consumes most project hours. Doors gain parametric depth first. Windows follow in sequence. MEP units round out the set. Custom families cover odd legacy fixtures.
- Quality assurance: A QA lead chases spatial deviations against the original cloud. Tolerance logs record each pass. Section cuts confirm geometry at random points. Owners gain hard proof of model fidelity.
- Documentation delivery: Drawings ship at the end of the run. The team packages every file for a clean handoff. Folder trees follow your naming standard. You open a ready set on day one.
Accountability runs deep across these roles. Your project manager owns scope alignment daily. Your senior modeler protects LOD targets per family. A QA lead chases tolerance against the cloud. Clear ownership keeps surprises away from your desk.
Understanding the Scan to BIM Workflow
Workflows differ across providers. Solid teams hold five stages every time. This sequence forms the core scan to BIM workflow. Checkpoints sit between each stage for tight control. Field reports include registration RMS values. Modeling leads share LOD progress mid-project. Auditors return deviation maps before sign-off.
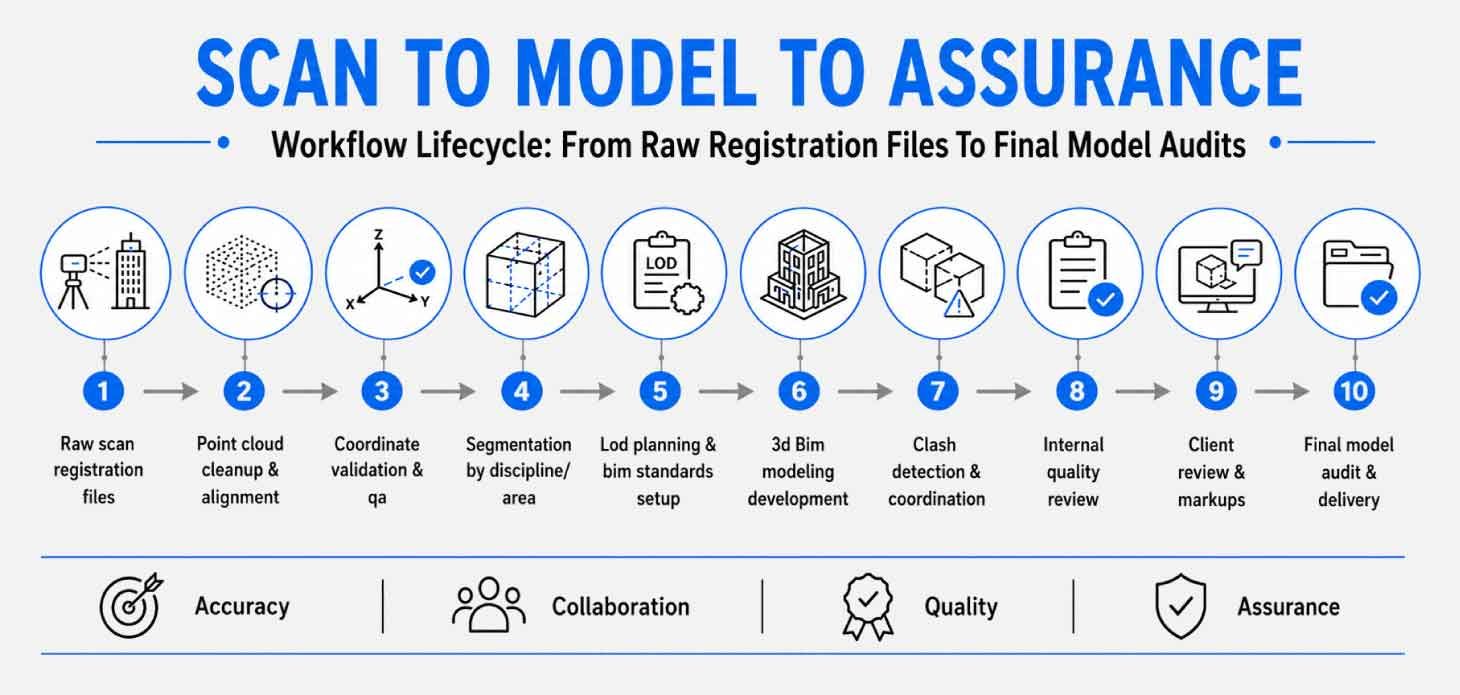
Real timing varies project to project. A 30,000 square foot floor plate scans in about two days. Registration runs four to six days at that size. Modeling takes three to six weeks across LOD targets. QA review adds the final week.
Types of Deliverables You Should Expect
Open your final package. The Revit model sits inside with linked discipline files. Federated coordination models join the set. Sheet sets cover the 2D drawing requirement. Asset schedules are tagged in for facility teams. As-built sheets ship as PDFs for owner use. COBie spreadsheets carry the asset register. These as-built BIM deliverables form the core of every handoff.
Naming conventions matter as much as formats. Strong providers follow your project standard. Many teams adopt BS 1192 templates for clarity. File trees stay logical across discipline folders. Revision tags track version control on every release. One file deserves special attention. The LOD declaration sheet maps each element class to its modeling depth. Downstream teams read it to grasp modeling limits.
| Deliverable | Format | Purpose |
|---|---|---|
| BIM model | RVT / IFC | Core authoring file for design teams |
| Coordination model | NWC | Clash review across disciplines |
| As-built sheets | PDF / DWG | Owner reference for the built record |
| Asset register | COBie spreadsheet | Facility management handover |
| Deviation report | Accuracy proof against the cloud | |
| LOD declaration | Modeling depth per element class |
Accuracy and LOD Standards in Scan to BIM Projects
Three factors shape final accuracy. Scanner resolution at capture distance sets the baseline. Registration tolerance across station pairs stacks on top. Your chosen modeling LOD wraps it up. Tolerance numbers tell the real story for owners. Scanner accuracy ranges from 1 mm to 10 mm at standard distances. Registration adds 2 mm to 4 mm of stack up across rooms. Final model accuracy depends on scan quality, registration accuracy, and the selected LOD.
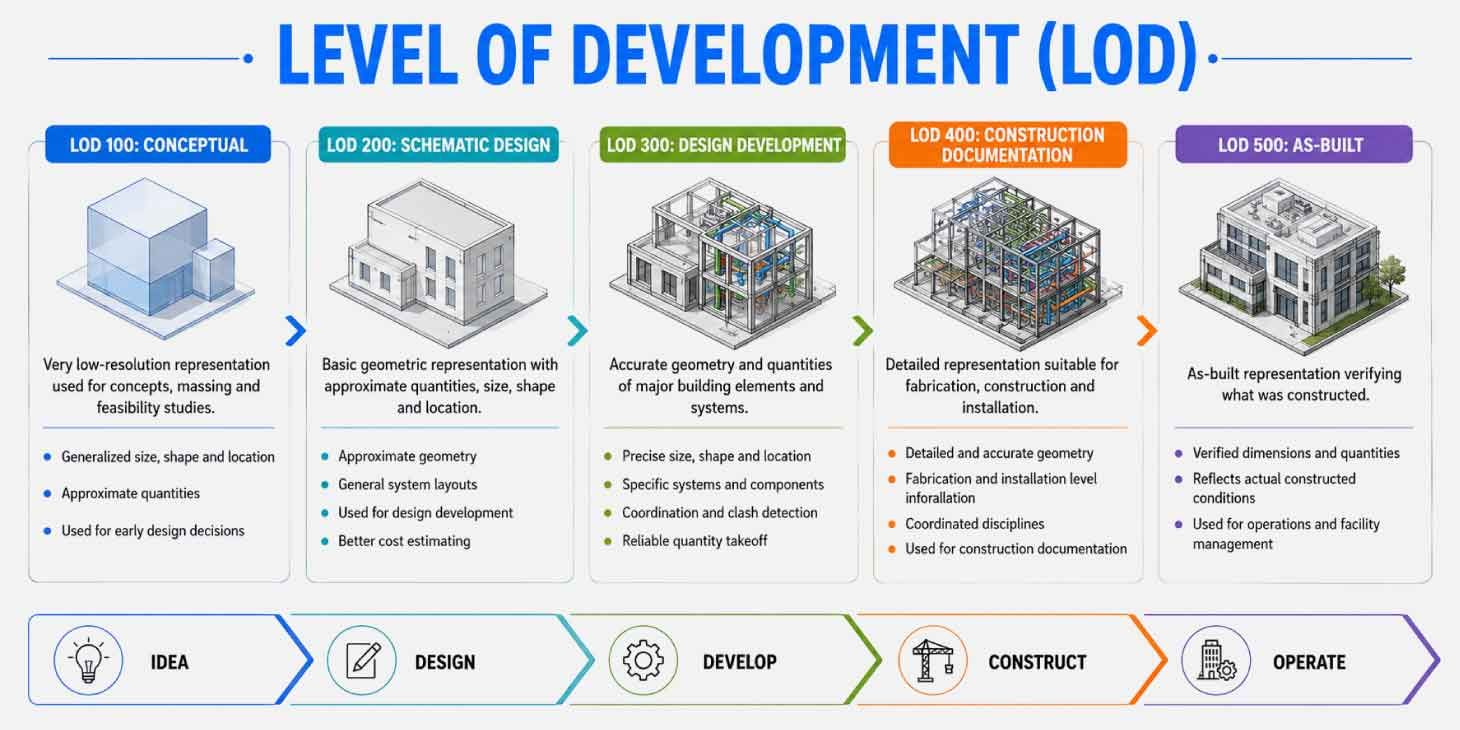
BIMForum LOD definitions guide most teams today. LOD 100 holds symbolic placeholders for early design. LOD 200 captures approximate geometry per family. LOD 300 holds accurate elements at design intent. LOD 400 carries content ready for fabrication. LOD 500 reflects field verified conditions after construction wraps. Renovation scopes mostly land at LOD 300. Fabrication work pushes up to LOD 400. The chosen level includes the price, schedule, and scope.
How Scan to BIM Supports Renovation and Existing Buildings
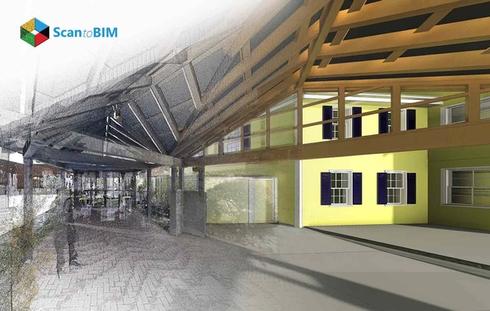
Old buildings rarely arrive with clean records. CAD files might sit on a server somewhere. Half stay outdated. The rest carry zero documentation. A scan program fills the gap within weeks. Design teams then move forward fast on the commercial renovation USA work. Specific owners create the demand here. Hotel chains scan portfolio assets for renovation programs. School districts capture aging buildings before retrofits. Hospitals document existing MEP risers before phased upgrades.
Long-term value runs deeper than the design phase. Structural engineers verify load paths against real conditions. Architects redo layouts with full confidence. MEP teams catch clashes early. The model feeds digital twin development for daily operations. Owners gain a living record across years. Facility teams keep that record current over time. Sensor data plugs into zones across the twin.
Role of Point Cloud Data in BIM Modeling
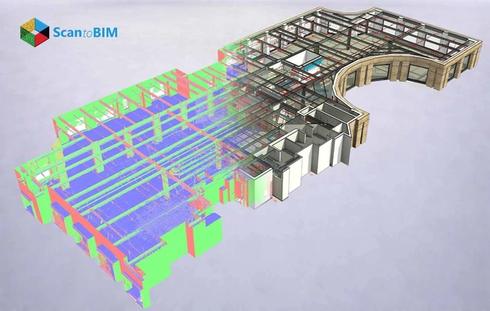
Picture millions of XYZ coordinates floating in space. Each point carries an RGB color value. Each point also carries a laser intensity reading. That data becomes the spatial foundation of every model. Point spacing makes or breaks usability. A 6 mm grid at a ten-meter distance suits most renovation work. Tighter spacing captures finer architectural detail. Good point cloud to BIM services ship three artifacts. The registered cloud arrives first in RCP or E57 format. The aligned BIM model links back to that cloud. The deviation report closes the set. Engineers dig into the raw cloud for complex geometry. Architects work inside the model itself. Facility owners review deviation maps before signing off. Careful scan data processing keeps every artifact accurate from capture to delivery.
Common Challenges in Scan to BIM Projects
Real jobs meet scan to BIM challenges across most engagements. Three core issues surface again and again. Operational and coordination challenges arise beyond the technical ones. Smart owners plan for everyone from day one.
- Scan completeness: Occluded corners produce gaps; MEP risers hold the heaviest congestion.
- Registration drift. Misalignment compounds across large floor plates. Careful targets keep the error small.
- Modeling interpretation. Different teams trace geometry through their conventions. Written standards keep outputs consistent.
- Site access. Access windows close fast inside live buildings. Crews coordinate around occupants in office towers.
- File size. Federated models grow heavy fast. Cloud platforms throttle large uploads from regional networks.
Questions to Ask Before Hiring a Scan to BIM Company
Smart owners run vendor interviews like a hiring round. Sharp questions surface from strong providers quickly. Ask these early in your search.
- Which projects in our asset class have you delivered?
- How do you document QA across milestones?
- What LOD depth do you model per element family?
- Which scanner brand fits our scope?
- How do you handle registration drift across high-rise buildings?
- Which file formats arrive in the final package?
- How does revision control work across stakeholders?
- How do you protect data security across cloud platforms?
- Which sample deliverables can you share today?
Choosing the Right Scan to BIM Partner
Pricing alone misleads early shoppers. A leading scan to BIM company shows quality metrics openly upfront. Deviation thresholds appear in the proposal. LOD targets per discipline carry a signed commitment. A single point of contact manages the engagement from start to finish. Check three operational items beyond price. Software stack alignment with your tools comes first. Team capacity for your timeline comes next. Project protocols across time zones close the list.
Contracts seal the deal more than promises. Look for accuracy thresholds written into the SOW. Look for delivery dates with clear damage clauses. Search for change order protocols in plain language. Strong providers welcome these provisions openly. Mature reality capture services treat written terms as a sign of confidence. Some senior teams add an on-site presence during field validation. That extra step closes the trust gap fast.
Conclusion
Vendor choice shapes outcomes across existing building projects. Owners gain scope clarity from the kickoff. Construction teams gain coordinated files across disciplines. Facility leaders inherit useful digital records for daily work. Point cloud to BIM services supports renovation studies. It supports retrofit planning across complex sites. It supports operational handover for portfolio assets. Value compounds across the asset lifecycle. Look for verification that is committed in writing. Push for quality reports openly shared. Treat the partner choice as a long-term call. The right provider returns value across many years.